Segmenter
Image segmentation identifies distinct features (regions) in an image by analyzing pixels. The Segmenter tool generates contiguous pixel regions (blobs) for each distinct feature.
Mark the feature you want the Segmenter tool to find using the various Label tools. After training, the tool can predict the appearance of the features in the new images.
The Segmenter tool requires training with both good and bad images for accuracy.
To set up the Segmenter tool:
-
ROI The Region of Interest (ROI) is the area of the image where the vision tool operates.: Set the ROI to create Views The area of the image that the device operates on is called a view. A view can be the entire image, a user-defined rectangular area of the image, or the output of a tool, depending on the tool. from your images.
-
Label: Use the Pen tool to mark the features you want the tool to find.
-
Train: Set the training mode and parameters. Choose the Train Model.
-
Process: Set the parameters and click Process All.
When processing finishes, the results panel shows detailed statistics about the results of the tool.
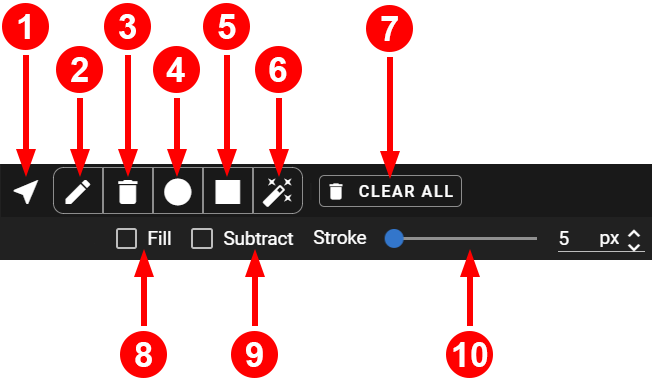
In the Label step, access the tools above the viewport:
|
|
|
| Number | Description |
| 1 | Move tool |
| 2 | Pen tool |
| 3 | Eraser tool |
| 4 | Ellipse tool |
| 5 | Rectangle tool |
| 6 | AI-assisted labelingLabeling is the process of marking features or defects in images, or categorizing the images into classes. Labeling is crucial for training Deep Learning Lite and Deep Learning Standard tools because the labels serve as training material to guide the tools how to function correctly. |
| 7 | Clear All button, clears all labels |
| 8 | For the Ellipse and Rectangle tools, check to fill entire area |
| 9 | For the Ellipse and Rectangle tools, check to erase area |
| 10 | Adjust the stroke width either by adjusting the slider or adding a new pixel value |
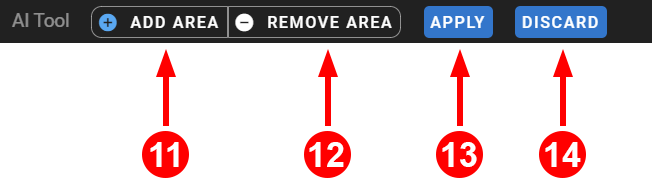
| 11 | Click parts of the image to add to label area |
| 12 | Click parts of the image to remove from label area |
| 13 | Apply AI labels |
| 14 | Discard AI labels |
-
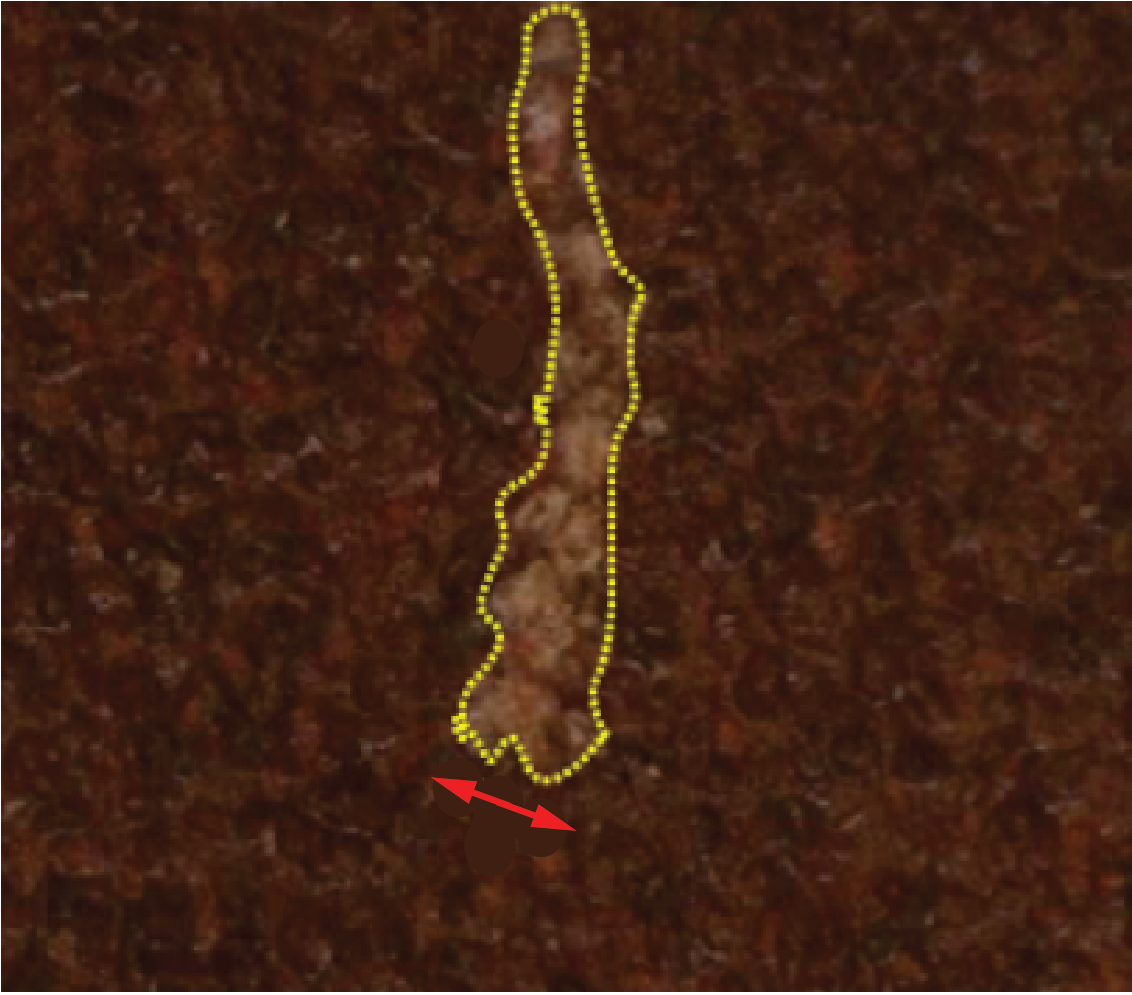
Mark the features you want the Segmenter tool to find with the available tools.
-
Use the Eraser tool or the Subtract options to delete unwanted parts of the label.
-
Use the AI Assisted Labeling to find features.
 About AI Assisted Labeling
Note: The tool requires the GPU for execution. Provisioning a GPU for initial use takes time, during which the menu bar displays a processing message.
About AI Assisted Labeling
Note: The tool requires the GPU for execution. Provisioning a GPU for initial use takes time, during which the menu bar displays a processing message.Use the Add Area and Remove Area buttons to refine the AI tool. Hold the Ctrl button while having Add Area selected to remove area instead, or the other way around.
Note: Due to system load, the tool might take 0.5 to 1 second to respond to mouse clicks. Avoid double-clicking.Click Apply to accept the label changes.
In the Train step, adjust the Training options.
-
Select the Training mode you want to use:
-
Deep Learning Lite
-
Few Sample: Default. Trainable with only a few images.
-
Accurate: Optimized for accuracy, requires more images to train.
-
-
Deep Learning Standard
-
Fast: Optimized for fast processing speed at runtime.
-
Accurate: Optimized for accuracy with large datasets.
-
Robust: Optimized to handle lighting and environmental variation.
Note: Deep Learning Standard is currently not deployable on In-Sightvision sensors. -
-
-
Adjust the training parameters as needed.
Deep Learning Lite - Few Sample Training Parameters
Training Parameter Deep Learning Lite - Few Sample Optimize If you check this box, the image sizes are optimized for the training process.
Resize Parameters Feature Size specifies the typical feature diameter in pixels. Adjust this setting to achieve a more accurate result by ignoring smaller image features than the specified Feature Size. The Feature Size approximates the size of a typical defect. For elongated defects, such as streaks, smears, scratches, and tears, the Feature Size approximates the width of the defect. For example, if the Feature Size is set to 16 pixels, any defect smaller than 16 pixels is ignored. For the best results, set the Feature Size slightly larger than the smallest defect you want to detect.
Feature Size strongly influences processing time. A Feature Size of 100 is 100 times faster than a size of 10, while a Feature Size less than 8 usually does not yield good results. When setting the Feature Size, consider the equation in regards to processing time (Ptime):
Ptime ~ F2
Deep Learning Lite - Accurate Training Parameters
Training Parameter Deep Learning Lite - Accurate Epochs Specifies the number of optimization iterations done during training. Use a lower value when your application has limited complexity, or when creating a lower quality model for testing different parameter settings.
The tools typically need to see the training data about 40 times, which is the default setting. This setting is sufficient for most standard applications.
If you use fewer epochs, the neural network modelEach AI tool is a neural network model. A neural network model mimics the way biological neurons work in the human brain. The neural network model consists of interconnected layers of artifical neurons, called nodes, and they have multiple layers. Neural network models excel at tasks like image classification and pattern recognition. can get stuck in learning, or become unable to accurately solve the problem. However, if you use too many epochs, you risk overfittingThe more training epochs that are used for training, the more accurately the network model responds to the training set images. After a certain amount of training, however, the improved performance of the network model on the training data is accompanied by poorer performance on unseen images..
Note: Temporarily reducing the Epochs parameter also makes the training time shorter.Optimize If you check this box, the image sizes are optimized for the training process.
Resize Parameters Feature Size specifies the typical feature diameter in pixels. Adjust this setting to achieve a more accurate result by ignoring smaller image features than the specified Feature Size. The Feature Size approximates the size of a typical defect. For elongated defects, such as streaks, smears, scratches, and tears, the Feature Size approximates the width of the defect. For example, if the Feature Size is set to 16 pixels, any defect smaller than 16 pixels is ignored. For the best results, set the Feature Size slightly larger than the smallest defect you want to detect.
Feature Size strongly influences processing time. A Feature Size of 100 is 100 times faster than a size of 10, while a Feature Size less than 8 usually does not yield good results. When setting the Feature Size, consider the equation in regards to processing time (Ptime):
Ptime ~ F2
Deep Learning Standard Training Parameters
Training Parameter Description Resize Parameters Feature Size specifies the typical feature diameter in pixels. Adjust this setting to achieve a more accurate result by ignoring smaller image features than the specified Feature Size. The Feature Size approximates the size of a typical defect. For elongated defects, such as streaks, smears, scratches, and tears, the Feature Size approximates the width of the defect. For example, if the Feature Size is set to 16 pixels, any defect smaller than 16 pixels is ignored. For the best results, set the Feature Size slightly larger than the smallest defect you want to detect.
Feature Size strongly influences processing time. A Feature Size of 100 is 100 times faster than a size of 10, while a Feature Size less than 8 usually does not yield good results. When setting the Feature Size, consider the equation in regards to processing time (Ptime):
Ptime ~ F2
You can also choose other Resize Parameters Options and set them according to your preference. The list of parameters you can set:
-
Fixed Area Resize
-
Fixed Size Resize
-
Fixed Size With Constant Padding Resize
-
Maximum Area Resize
-
None Resize
-
Relative Size Resize
-
Relative Size With Quantization Resize
Augmentation Options Horizontal Flip Performs flipping in horizontal direction. Use in cases where the location and the angles of the object are not strictly fixed. Vertical Flip Performs flipping in vertical direction. Use in cases where the location and the angles of the object are not strictly fixed. Rotation 90° Performs 90° rotation in clockwise direction.
Note: If you select Horizontal Flip, Vertical Flip, and Rotation 90°, the tool performs 0°, 90°, 180°, and 270° rotations probabilistically.Rotation Performs rotation between 0° to 45°.
Note: Note: If you select Rotation 90°, Rotation, Horizontal Flip, and Vertical Flip, the tool performs random rotation between 0° to 360°.Luminance Adjusts luminance by adding a random value to all channels. The random value follows uniform distribution within a range of - 255 to 255. Use when the images have inconsistent luminance because of the irregular lighting environment. Contrast Adjusts contrast by multiplying a random value for all channels. The random value follows uniform distribution within a range of 0 to 2. Use when the images have inconsistent contrast because of the irregular lighting environment. Colorwise Adjusts color by multiplying or adding different random values to each channel. Use this parameter with the Contrast or the Luminance parameter. The Colorwise setting makes the Contrast and Luminance parameters apply different random values to each color channel instead of the same value to all channels. Use when the images have inconsistent color tone because of the irregular lighting environment. Sharpness Randomly sharpens the views by image filtering within a range of 0 to 2. Use when the image are too blurry. Blur Randomly applies Gaussian Blur to the views. The random variable follows to the Gaussian Sigma Distribution within a range of 0 to 2. Use when the images are too sharp. Gradation Randomly adjusts the gradation. Use when the images have inconsistent gradation because of the irregular lighting environment. Noise Applies noise by multiplying a random value per pixel for all channels. The random value follows uniform distribution within a range of 0 to 2. Use when the images are distorted or contaminated by dust due to the deterioration of the optical equipment. Zoom In Randomly zooms in from the center. The maximum zooming is 5/6 of the original size. The random variable follows uniform distribution. Use when the feature is an irregular size. Distortion Applies a distortion by picking the points in the views and moving them. The number of points is the same or less than six. Use when the images are distorted due to the deterioration of the optical equipment. -
-
To auto-assign roles to images, click Auto-Assign Roles. A pop-up window provides you with options for how to assign roles:
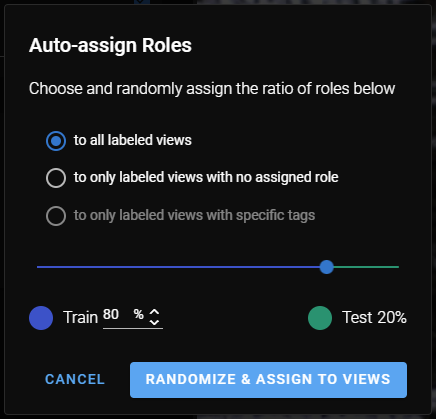
See the Label section for more information.
After training, adjust Process step parameters to accurately inspect the image dataset.
-
Set the appropriate process parameters. Process parameters vary based on the train mode and model selected.
 Processing Parameters
Processing Parameter Description Minimum Blob Area Filters out results with an area smaller than this value. Threshold Values below the threshold are the view background. Values above are the foreground. Simple Region Check the box to simplify and remove inner holes in the region. -
After you set the parameters, click Process All.
-
Review the inspection results for your image data set. For more information, see Metrics and Statistics.
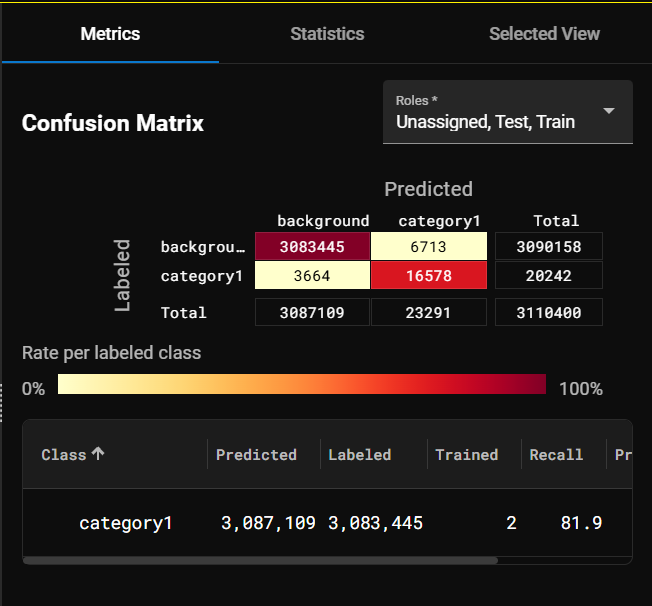
If you add an AI tool downstreamA downstream tool requires a previously configured upstream tool and its configuration as input. The tool is placed after its upstream tool in the toolchain. from another AI tool, extra parameters appear in the ROIThe Region of Interest (ROI) is the area of the image where the vision tool operates. step of the downstream tool.
If the Segmenter tool is the upstreamAn upstream tool comes first in the toolchain and its output defines a downstream tool. An upstream tool can have several downstream tools. tool for a Classify or Locate tool, the following optional parameters appear in the downstream tool ROI settings:
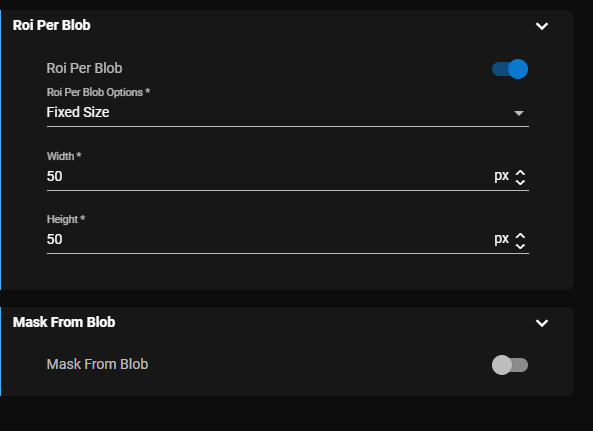
Enabling the ROI per Blob option on the downstream tool generates an ROI for each blob received from the Segmenter tool.
The views processed by the tool increase from N to N x number of blobs. The ROI of each blob is displayed, and the graphic resizes automatically as you adjust the parameters.
| Parameter | Description |
| Fixed Size | A fixed-size ROI is created for each blob, centered on its center of mass. Specify the fixed size using width and height parameters. |
| Dynamic Size |
For each input blob, an ROI is generated for every blob based on blob bounding box. Choose between the Absolute or Relative border. Absolute Border:
Relative Border:
|
Mask from Blob performs dynamic masking. The tool uses the blobs to generate masks and apply them to the input view during the ROI phase. The mask graphics are displayed, and the graphics resize automatically as you adjust the parameters.
| Parameter | Description |
| Invert | When selected, the mask is applied only to the pixels of the blob(s). |
| Grow Shrink | Adjust the size of the mask by specifying the number of pixels to extend or reduce the mask beyond the blob edges. Positive numbers increase the mask area, and negative numbers reduce the mask area. |